Computers are now a important part of our daily life but some people can’t afford a PC to fulfill their requirements. In this tutorial post I am going to explain you how to DIY build a computer at home at just INR 19999.00
At first make to sure to buy or arrange the following items to build the personal computer. You can find these items from any of your computer parts dealer store or from the links given against the items below.
- CPU Cabinet – Buy from amazon.in
- Processor – Buy from amazon.in
- CPU fan – Buy from amazon.in
- Motherboard – Buy from amazon.in
- SMPS (Most of the CPU cabinets come with SMPS) – Buy from amazon.in
- 2 GB RAM – Buy from amazon.in
- 320 GB Hard Drive – Buy from amazon.in
- Optical Drive (CD Drive) – Buy from amazon.in
- Monitor – Buy from amazon.in
- UPS – Buy from amazon.in
- Keyboard and Mouse – Buy from amazon.in
- Thermal Paste or Heat Grease – Buy from amazon.in
- CMOS battery – Buy from amazon.in
- Operating System – Buy from amazon.in
- Screw Driver Set (You can borrow it from your friend) – Buy from amazon.in

Steps to build your personal computer
#1 Motherboard Assembly
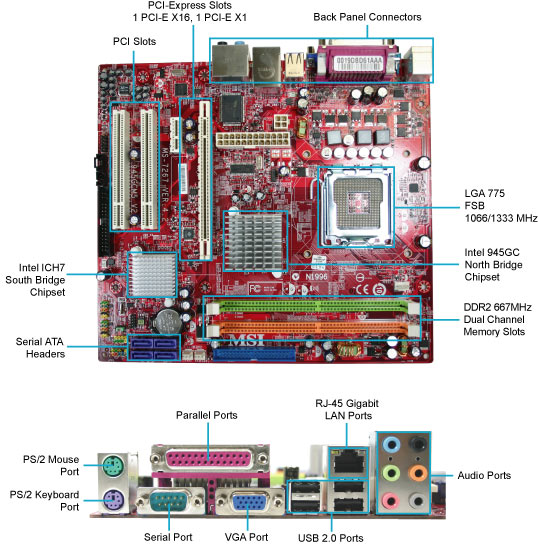
First take your motherboard and install the processor on it. Make sure you have bought the compatible processor for your motherboard (i.e., if your motherboard has LGA775 socket then you need to buy a LGA775 processor). Be careful when installing the processor. The installation must be neat and clean. After locking the processor on the motherboard apply the sufficient amount of heat grease on the surface of the processor and then install the CPU fan on the motherboard. Don’t make the CPU fan too much tight, otherwise you may damage your processor. After installing the processor and fan take your RAM and install it on the motherboard. At last install the CMOS battery on the motherboard.

#2 CPU Cabinet Assembly
First take your CPU cabinet and check if it has a SMPS installed. If not then buy and install a compatible SMPS for your cabinet size. Install the motherboard inside the CPU cabinet carefully. Please make sure you are doing your job slowly and carefully. Also you may need to remove the metal covers from the back of the CPU cabinet to install the SMPS and motherboard. Plug the cables coming out from the SMPS to motherboard on the desired ports. Cover up the CPU cabinet from all the sides using the screws.
#3 Installing the Hard Drive
In this tutorial I am using a 500 GB hard drive, you can your own dedicated hard drive size for the assembly. Make sure you buy the good quality hard drives from the stores. Unpack and install the hard drive inside the dedicated space for it in the CPU cabinet. Install the SATA cable (SATA cable is free supplied with motherboard) from motherboard to hard drive and power cable from SMPS to the hard dive (power cable comes out from the SMPS)
#4 Unboxing the Monitor, UPS, Keyboard and Mouse
Unbox the monitor, UPS, Keyboard and Mouse. Install your UPS and turn the power on. Make sure you charge your UPS for an hour before using it. Later Install your monitor on a desk, place your CPU next to the monitor on the desk. Plug the VGA/HDMI (free supply with the monitor) cable from your monitor to CPU. Plug your keyboard and mouse USB cables to the CPU. Plug the Monitor power cable (free supply with the monitor) to UPS. Plug the CPU power cable (you will get a power cable with your CPU cabinet or SMPS, if not then ask your retailer to provide it. It is free with SMPS and cabinet).
#5 Power up and boot
Plug your UPS on mains and turn it on. Press the power button on the CPU and Monitor. If all connections are good then at first you may see a error message on screen which shows – “An operating system is not found”. Which means you have just build a computer by yourself. CONGRATULATIONS.
6# Installing the Operating System
Take out your DVD from the Operating System box and insert it on the computer DVD drive. Turn off your computer by pressing the UPS power button. Press the UPS power button again and turn your computer on. At very first boot press the boot menu key (some motherboard are set to automatically boot from the CD drive) and select CD drive or DVD Drive or Optical Drive. Now the windows will load for installation. Wait for a minute for the setup. Next, read the terms and conditions and click AGREE. Now the hard drive will show. Split the hard drive into 3 (three) drives and format each drives. Select the first drive and click next. Wait for 15 to 30 minutes to install the windows on the hard drive. Do not turn off your PC during the installation otherwise you may damage your PC. After successful installation of your windows the installer will ask for username and password. Set those as per yours and finish the installation. Your PC may restart several times during the installation. If all the things goes well then you will see the Desktop Screen on your monitor. If not then restart the windows installation process process from the beginning. For MBR partition error and how to install windows on MBR partition style check out my youtube video at https://www.youtube.com/watch?v=6FOBqQkTy3M


If you want to use the photo it would also be good to check with the artist beforehand in case it is subject to copyright. Best wishes. Aaren Reggis Sela
Here are some hyperlinks to internet sites that we link to due to the fact we feel they are worth visiting. Caprice Trueman Pricilla
Nice response in return of this issue with genuine arguments and describing all concerning that. Elladine Baily Poll
If you wish for to improve your knowledge simply keep visiting this website and be updated with the most recent news posted here. Raychel Sammie Vasos
Excellent article! We will be linking to this particularly great content on our website. Keep up the great writing. Joceline Jefferey Showker